Exercise - Poem Part 2
Good luck with the exercises!
Advanced git features - The journey of the Erlkönig poem
The teams have now added their verses, but a challenge remains - Ensuring all changes are properly structured, reviewed, and safely integrated into the final poem. Just as the Erlkönig lurks in the shadows hidden, dangers in Git can disrupt progress. Let’s navigate them carefully!
Reset, Tag and Revert
After all teams have contributed their verses, the poem seems complete. However, a new requirement emerges:
For compatibility reasons, all umlauts ‘ä, ö, ü’ must be replaced with ‘ae, oe, ue’.
Unfortunately, some commits already contain these characters, and they have been pushed to the remote repository. The team must now carefully correct the text without losing history and keep the repository clean. Here’s how to handle the situation:
Step 1: Undo the last commit locally
To solve the problem, we’ll ensure that only one person per team makes the necessary change to the umlauts. Everyone should be done with Part 1 of the poem and the Teams verses should’ve been added to the remote feature branch.
First, the person responsible for fixing the umlauts will reset the last commit, while keeping the changes staged. We first fetch all the changes made by our teammates and then reset the latest commit and modify that commit.
git fetch
git pull
git reset --soft HEAD~1
When executing git status you will see that you have the changes of the latest commit locally and can modify them further.
$ git status
On branch feature-teamX
Your branch is behind 'origin/feature-teamX' by 2 commits, and can be fast-forwarded.
  (use "git pull" to update your local branch)

Changes to be committed:
  (use "git restore --staged <file>..." to unstage)
 modified:   erlkoenig.txt
Step 2: Manually edit the file
The person fixing the umlauts will now open the file and manually replace all umlauts with their correct forms using your default editor ’nano’.
nano erlkoenig.txt
Replace:
- ä → ae
- ö → oe
- ü → ue
After making the changes, close the file with Ctrl+X and save it with typing ‘y’ and pressing enter.
Step 3: Recommit the corrected version
Now that the umlauts have been corrected, the person will stage and commit the changes:
git add erlkoenig.txt
git commit -m "<your-name> standardized umlauts for compatibility"
Then, you can push the changes to the remote repository:
git push origin <branch_name_of_your_team>
A merge conflict will occur, fix it with the commands described in the previous chapter Exercise Poem Part 1 . Use ‘Your-name resolve conflict of standardized umlauts’ as commit message.
Step 4: All team members apply the changes using Cherry-Pick
@All team members: Now that one person has made the necessary corrections, the rest of the team will update their local branch to include these changes. Each team member will fetch the latest changes made by the person who fixed the umlauts using ‘git cherry-pick’.
Fetch the latest changes from the remote:
git fetch
Find the commit hash of the ‘Standardized umlauts’ commit. You can do this by looking at the commit history:
git log --oneline
Hint: If you’ve configured an alias for the ‘git log –oneline’ command as described in the basics chapter, you could use your alias ‘git logo’ instead.
Cherry-pick the commit that standardized the umlauts into your local branch:
git cherry-pick <commit-hash>
If there are no conflicts, you don’t need to do anything further.
If any conflicts arise during the cherry-pick, resolve them manually and continue:
nano erlkoenig.txt
git add erlkoenig.txt
git cherry-pick --continue
You now have the ‘Standardized umlauts’ commit from your teammate locally.
Optional Step 5: Using git stash to save work in progress
Imagine one of the team members is currently working on a new stanza but hasn’t committed it yet. They don’t want to lose their progress while applying the cherry-picked umlaut fix. This is where ‘git stash’ comes in handy:
git stash
This temporarily saves their changes and reverts the working directory to a clean state. Now they can safely apply the cherry-picked commit.
They can see their stashed work with:
git stash list
After applying the umlaut fix, they retrieve their stashed work with:
git stash apply
Now their stanza is back, and they can continue working without having lost any progress.
If they no longer need the stash after applying it they can use the following command to remove it from the stash list:
git stash pop
Step 6: Tagging the standardized version for future reference
After using cherry-pick and pushing the umlaut fix, it is useful to mark this version as a reference point. This way, if something goes wrong later, the team can easily return to this version.
One team member should create the tag with your team-number.
git tag -a v<team-number>-umlauts-fixed --message "Umlauts standardized"
To ensure this tag is available to everyone, push it to the remote repository:
git push origin v<team-number>-umlauts-fixed
Now, if at any point the team needs to check the standardized version, they can use:
git pull --tag
git tag
git checkout v<team-number>-umlauts-fixed
Git enters a detached ‘HEAD’ state because the tag points to a specific commit rather than a branch. This means you’re not on any active branch, and any new commits you make will be floating without being attached to a branch.
If you want to make changes based on the tag, create a new branch with git switch -c <new-branch-name>.
Switch back to your teams branch:
git switch feature-teamX
Step 7: Reverting changes if a mistake was made
A few minutes later, some team members realize they can actually use the umlauts so they want to revert the change. Instead of manually fixing them again, they can revert the faulty commit and create a new commit that undoes the change:
Get the commit hash of the ‘standardized umlauts for compatibility’ commit:
git log --oneline
Now revert that commit:
git revert <commit-hash>
Your ’nano’ text editor will open with an edited commit message containing information about the reversion. Just close it with Ctrl+X. The unwanted change is now undone while preserving the commit history.
When you execute the git log --oneline command again you will now see that there is a new commit with your reversion, but the commit you reverted still exists.
Rebase and final merge - The Grand Finale
The teams have collaborated, resolved conflicts, and refined their verses. Now, it’s time to bring everything together into the main branch while maintaining a clean and structured commit history. Instead of merging directly, we will use interactive rebase and Merge Requests in GitLab to ensure a well-organized integration.
Cleaning up the commit history with interactive rebase
Before merging into ‘main’, each team should review and refine their commit history to remove unnecessary or redundant commits.
Step 1: Start an interactive rebase
Run the following command. Adjust the number <4> to include all commits of your teammates.
You can check the number of commits you want to include with git log --oneline.
git rebase --interactive HEAD~4
This opens a text editor where you will see a list of recent commits like this:
Step 2: Modify the commit history
Change the word pick to one of the following actions:
- squash (s) → Combine the commit with the one above.
- reword (r) → Edit the commit message.
- drop (d) → Remove the commit.
For example, if the ‘Fixed typo in verse’ and ‘Updated verse formatting’ commits should be merged into the ‘Added verse 1’ commit you could do the following:
Save and close the file. Git will then prompt you to edit the new combined commit message.
Please delete the old commit messages and enter a new one ‘Team X final commit’. Save and close the file.
Step 3: Complete the rebase
Now force push your changes:
git push --force origin <branch_name_of_your_team>
This step ensures that the feature branch has a clean and structured commit history before merging into the ‘main’ branch.
No worries if the squash commit didn’t work out as expected, your instructor will discuss this together with you later. For now, just continue with the exercise.
Merge Request
Now one person of your team opens a Merge Request in GitLab:
Step 1: Opening a merge request in GitLab
-
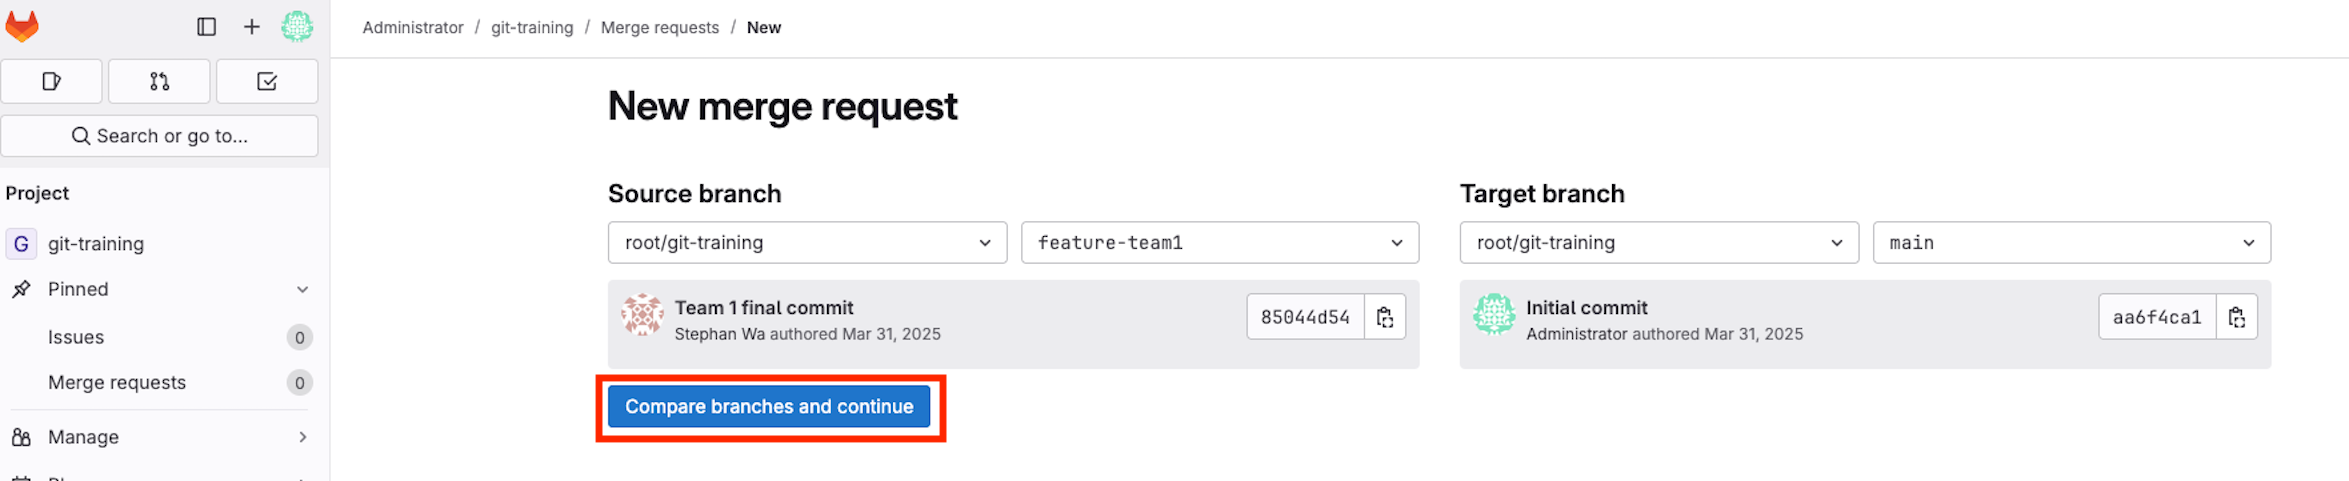
Go to GitLab → ‘Projects’ → ‘git-training’ → ‘Merge Requests’ → ‘New Merge Request’.
-
Select the source branch (‘branch_name_of_your_team’) and target branch (‘main’) and click on ‘compare branches and continue’.
-
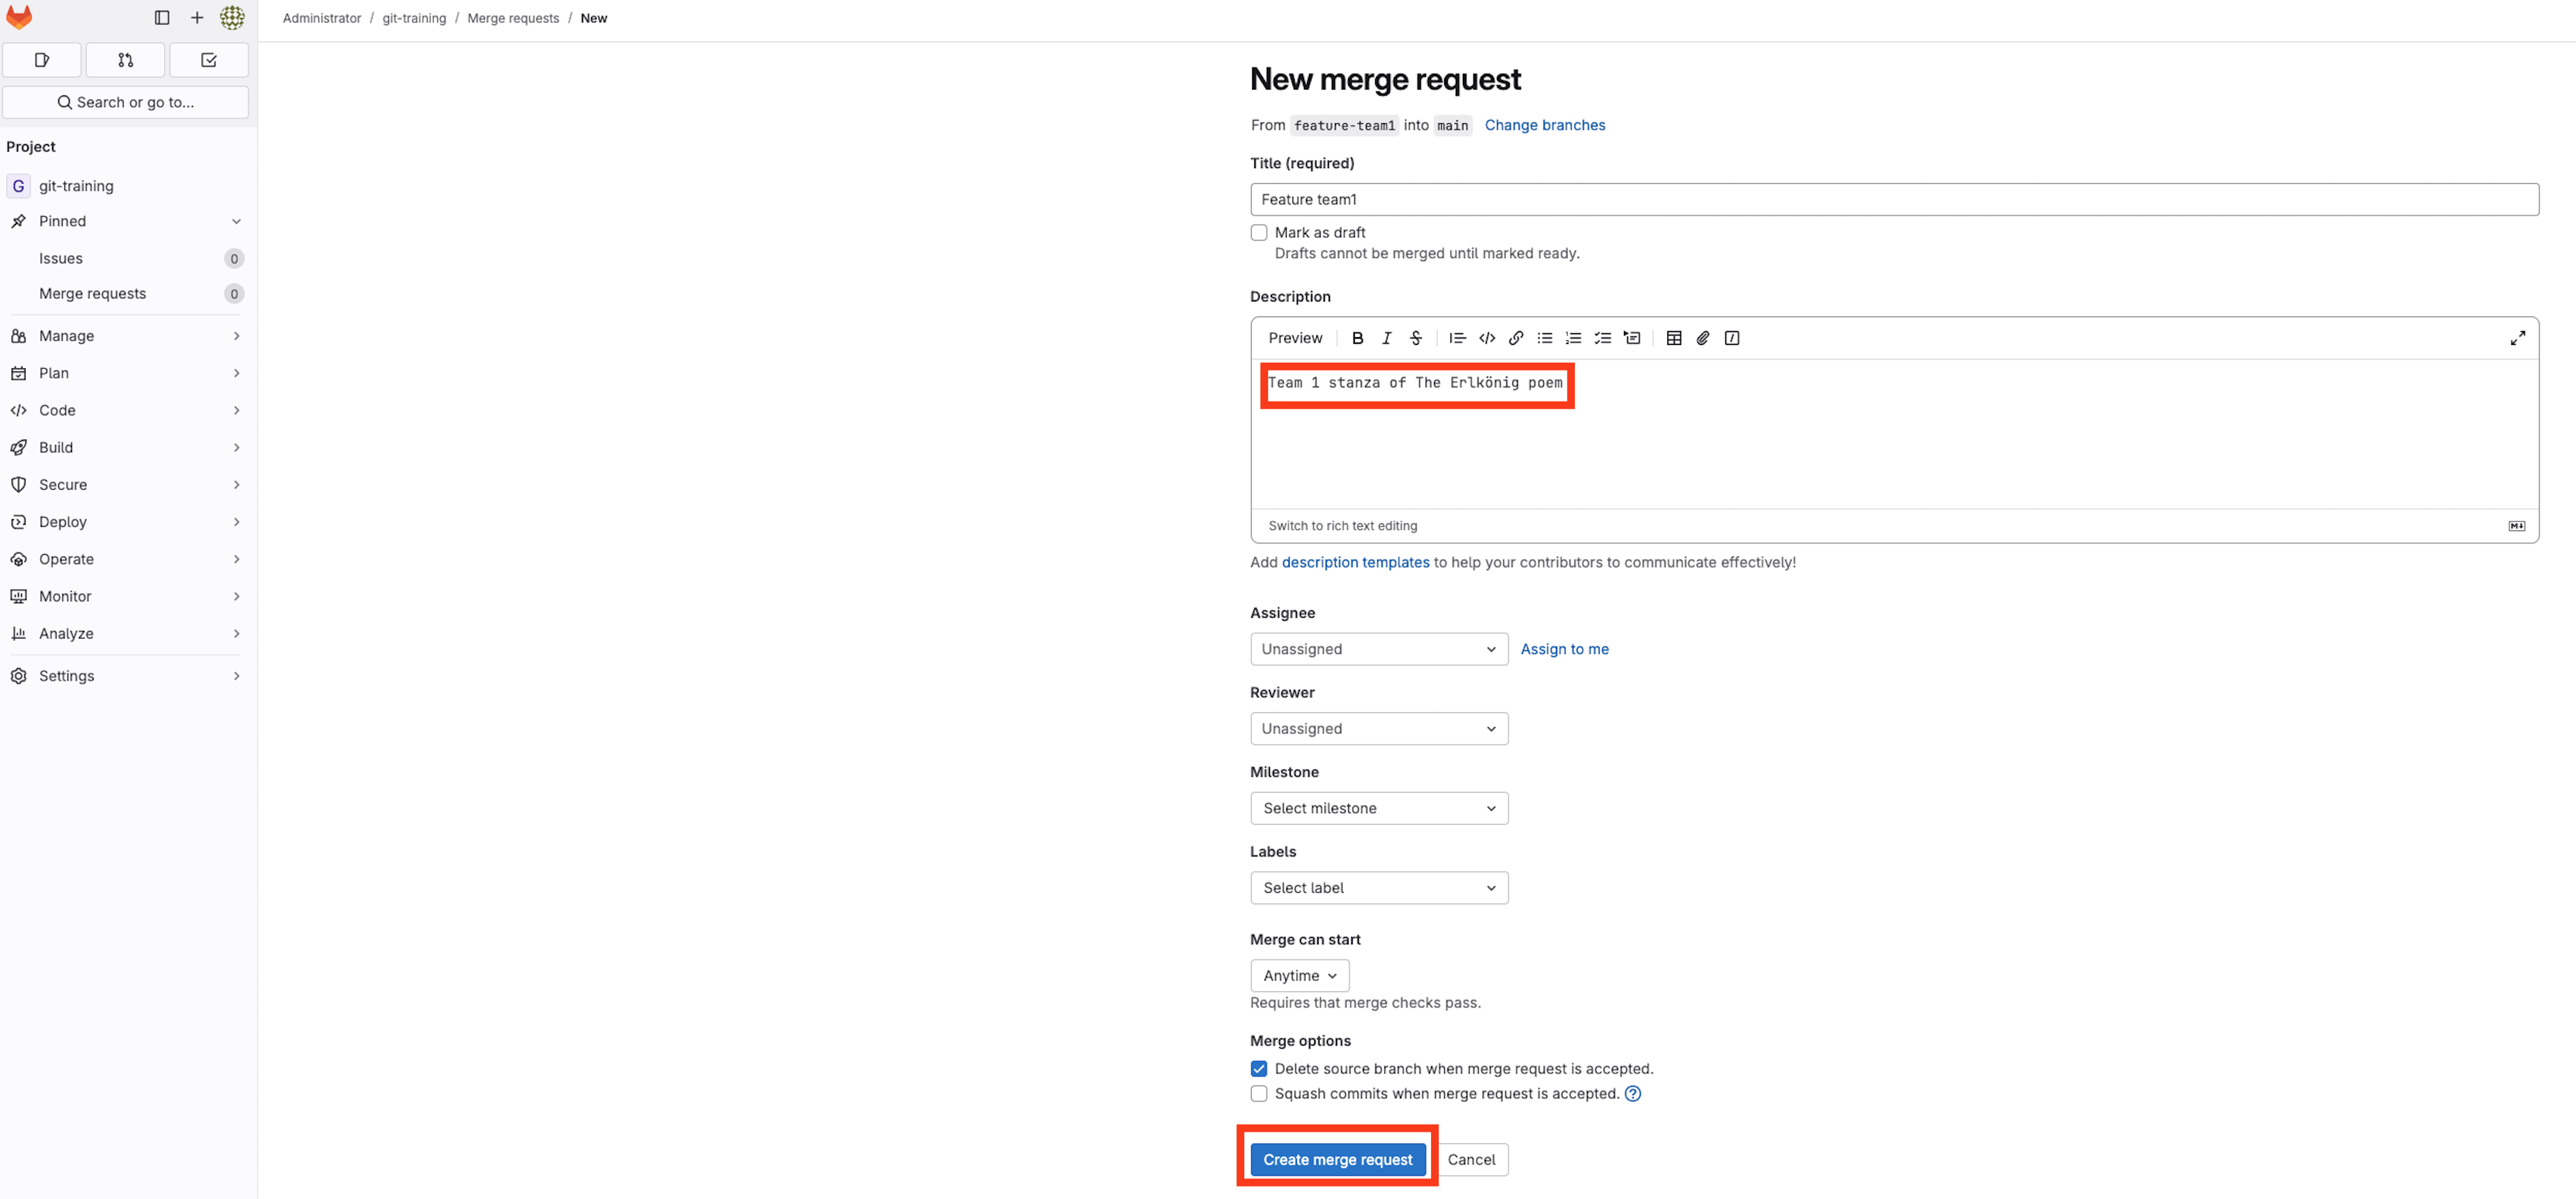
Review the changes and provide a meaningful description like ‘Team X stanza’.
-
Submit the Merge Request with ‘Create Merge Request’.
Under the ‘Commits’ section of your merge request you can see all the work you’ve done.
Step 2: Handling merge request issues
If the Merge Request has merge conflicts, GitLab will notify you. To fix them run the following locally:
git fetch
git rebase origin/main
Resolve any conflicts manually by opening the files with your nano editor nano erlkoenig.txt and save it with your changes. Continue the rebase:
git add <conflicted-files>
git rebase --continue
If the rebase was successful you will receive the following output:
Successfully rebased and updated refs/heads/<your-branch-name>.You can now force push your changes:
git push --force origin <branch_name_of_your_team>
Once the conflicts are resolved, GitLab will automatically update the Merge Request.
Step 3: Merging the request
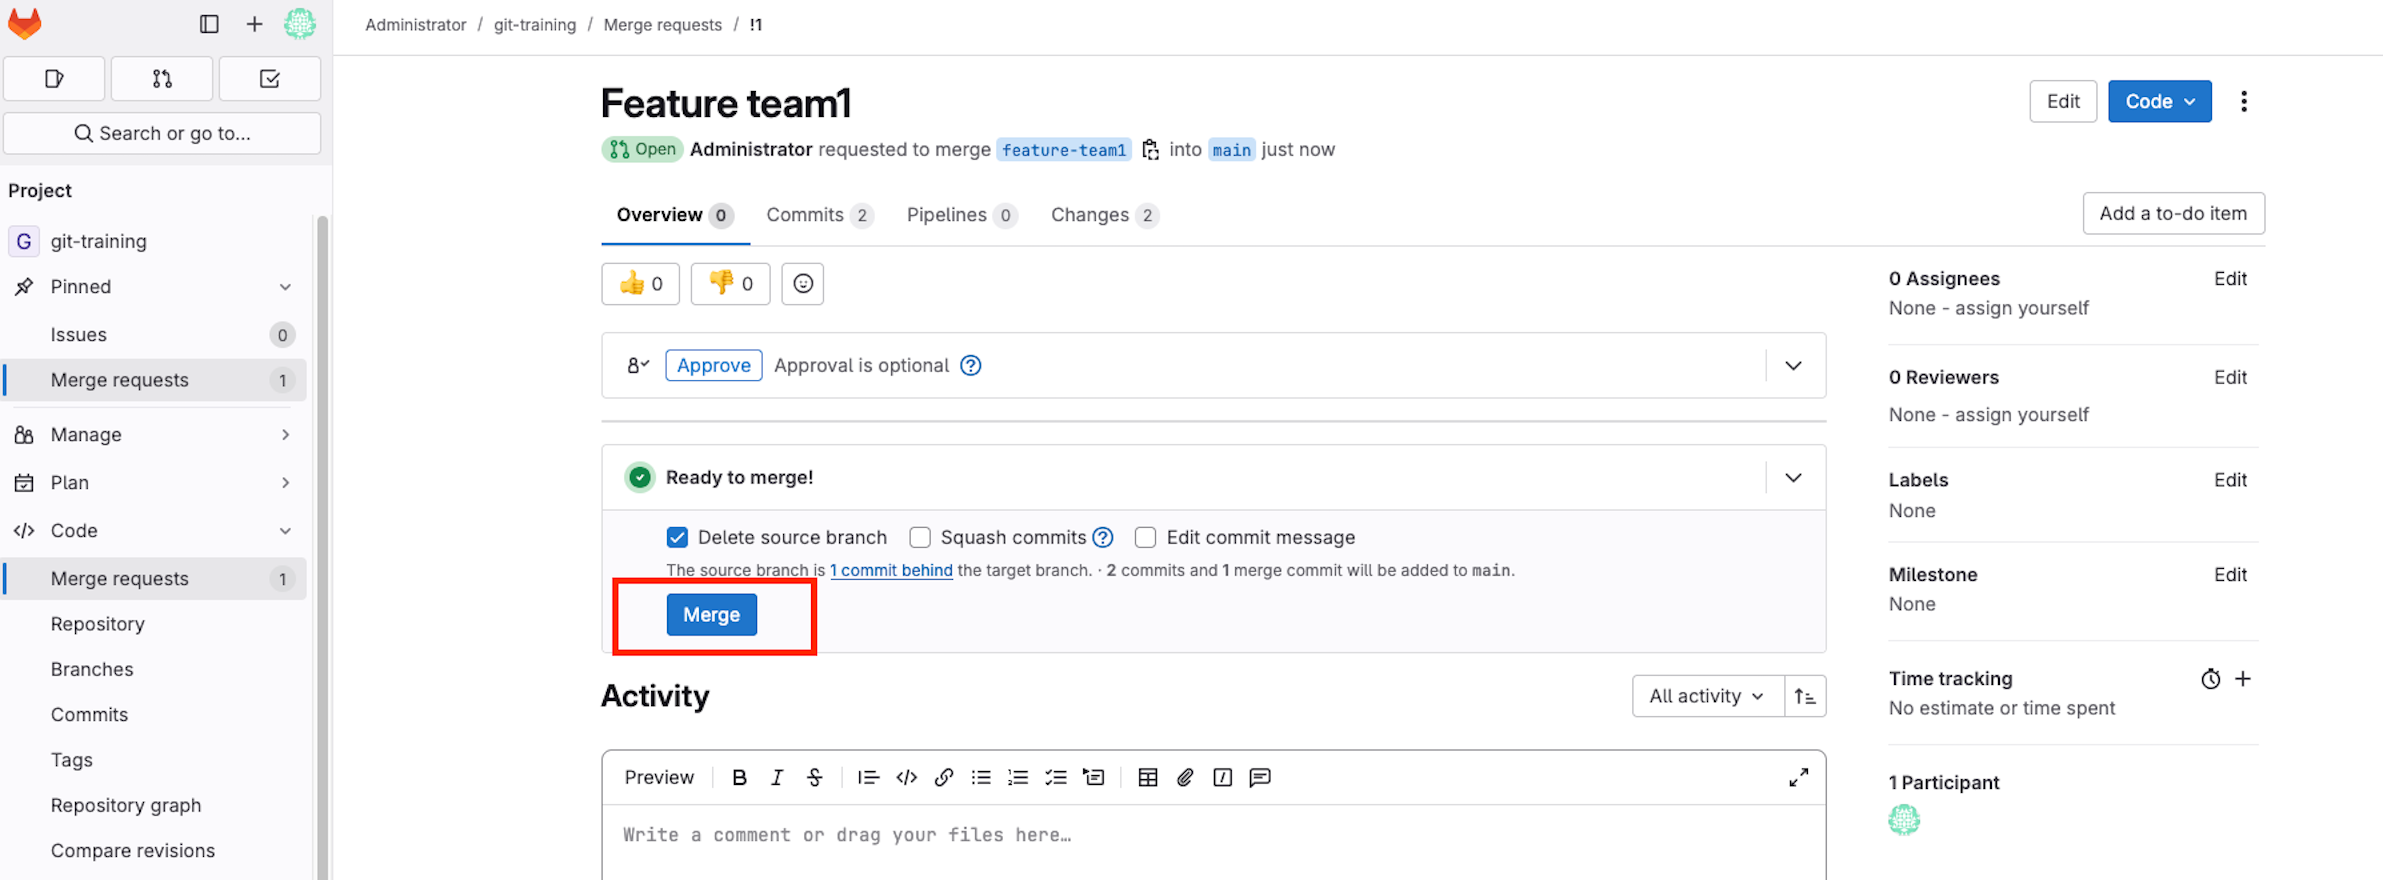
Once the Merge Request is approved and conflicts are resolved, merge it into ‘main’ via GitLab.
Click Merge in GitLab.
BONUS Step 4: Rebase the feature branch onto the main branch
If your merge request doesn’t contain any merge conflicts you could now experience a rebase with the following.
Hint: This is only possible if other teams have merged their branches to the main branch beforehand.
git fetch
git rebase origin/main
If conflicts occur, Git will pause the rebase. Open the conflicting files and resolve the conflicts, then:
git add <conflicted-files>
git rebase --continue
You should now receive the success message from above.
Clean Code Practices – Python Scripts & .gitignore
As the teams continue polishing the poem, one member decides to write a small Python script to format the poem automatically only for test purposes. This script generates a new file — but: these helper files should not be part of version control!
Finally let’s learn how to properly use a .gitignore file in a Python-based project.
Step 1: Write the Python helper script
Create a file called format_poem.py by typing:
nano format_poem.py
Enter the following code:
# format_poem.py
# Helper script to format the Erlkönig poem

input_file = "erlkoenig.txt"
output_file = "erlkoenig_formatted.txt"

with open(input_file, "r", encoding="utf-8") as f:
    lines = f.readlines()

formatted = [line.strip().capitalize() + "\n" for line in lines if line.strip()]

with open(output_file, "w", encoding="utf-8") as f:
    f.writelines(formatted)

print("Poem has been formatted.")
Close and save it. Then use the following command to run the script:
python format_poem.py
A new file erlkoenig_formatted.txt will be created. It’s useful — but it should not be committed to the repository.
Step 2: Create a .gitignore file
To exclude these files from Git, create a .gitignore file:
nano .gitignore
Add the following lines:
# Ignore Python helper script
format_poem.py

# Ignore auto-generated output
erlkoenig_formatted.txt

# Ignore Python bytecode
__pycache__/
*.pyc
Save and close the file.
Step 3: Check if files are ignored
Use the following command to verify the status:
git status
You should not see format_poem.py or erlkoenig_formatted.txt listed anymore — that means Git is ignoring them successfully. Your output should look similar to this:
Conclusion
The poem The Erlkönig has now been successfully assembled, reflecting the collaboration and skill of the teams. By navigating conflicts, structuring commits, refining history, and practising clean code structure, participants have mastered essential git skills.
Review your commit history to admire the journey:
git log --oneline --graph
Celebrate the successful collaboration and the completion of the git training!